Showing posts with label My Project. Show all posts

Thursday, 8 November 2012

Oil tank.

The stock tank just won't work. Well, It work's, in that it doesn't leak, oil goes in the top, and comes out the bottom when needed, but it just won't work.

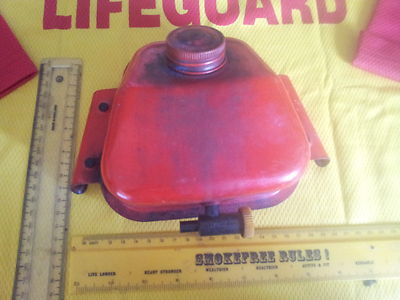
Cruddy, hideous thing (it did clean up, and looks nearly new now)


I'd picked up a car alloy catch tank, thinking this was along the right lines, it's not. I then thought perhaps an earlier model steel tank rather than the ugly plastic stock tank would work, but at the time, I couldn't find one without paying silly money, and even sillier money to ship it from the states.

Shapes nicer, and this one is on ebay at reasonable money for a change
I stumbled on a petrol lawn mower fuel tank on ebay, the only bidder with a .99p start price. It was kinda what I wanted, a steel tank at least.

Worth a punt at 99p

The mower tank got me thinking, and I ended up with this! It's a bit wider than I want. In fact twice as wide as I want, but I could work with it, and I love the glass fuel bowl.

I've got to use that fuel bowl somewhere

Brave enough to try welding for real, the tank was cut in half, a new peice of steel cut to shape, and welded back in place. Ok so there was some splatter, but it's air tight! I had hoped to use the other half, trimmed, re-shaped, and re-welded, as the base for a battery tray, but if I'm honest, I blew a bloody great hole in it with the welder, so that's binned.


I'm happy with the end result though. Bobber style in side profile, all steel, and look's better than the plastic original.

LED Tail light's been ordered, delivered and fitted. Look's sweet.


Now, I need to start on the exhaust.


Although not in the picture, the original header pipe has been cut, two bends cut and shaped, and ready for tack welding. Lot's of work to get the tail pipe where I want it still, and brackets need fabricating.

Wednesday, 7 November 2012

Bum perch......................

Well I've not been entirely idle.

I've spent hours, cutting, grinding, brushing, rubbing down and painting the old seat pan. Carefully shaping it to fit flush with the frame, maintaining the original hinges (I'm still hung up about accessing the two stroke oil tank) and giving it a coat of hard black paint, after removing the gold Hammerite, and the rust underneath.


Don't like it! I thought I'd like the seat to have a little kick up at the rear. I don't. The hinges don't sit flush with the frame, protruding 7mm. Looks wrong, even though the exhaust will cover it up.

Plan B then.

I cut the first seat pan out of some left over alloy chequer plate I had. I then pondered for ages over how I was going to fix it to the frame. Without a welder, I'm limited to making bracket's and hinges that will rivet or bolt on. In the end, I realised I'd cut it 30/40mm to short, and the rear was just a bit to squared of. Without any more alloy, I turned to some sheet steel. The second cut (after I did what I should have done and used some card for a template) and I'm happy.

Now as I've already cut the seat subframe down, and needed to make good, and I would ideally like to weld the seat pan, and the expansion chamber I bought would need cutting and welding, and I'd need to fabricate some hangers for it, and weld them on, and.......................... I bought a MIG welder.

It's a pretty basic, 4 setting 130amp welder, hopefully it will do what I want
Not easy welding, is it? Armed with a useless instruction manual, and after watching two or three really bad "how to weld" instructional's on You Tube, I've locked myself away, with some off cuts of mild steel, and welded......and welded, and, sadly, not very well.

The steel pan is quite heavy. A bit more so than the stock pan, so, armed with some hole cutter's, I've (to quote the late Colin Chapman) added lightness. Although it wont be seen (but I'll know it's there) I've then bolted on some Stainless Mesh I'd had in my garage for more than 20 years (bought to make an MG Midget Grille, but never used) I'll then wrap the underside of the foam in a contrasting vinyl - orange sounds good - before adding a black seat cover.

Just ordered some flat head socket screw's, which will look better

The "Hook" is 30mm od pipe, cut and welded. There's zero sideways or forward movement.
Tabs hold the mesh firmly in place. The seat pad will cover all this.
I've been busy with the welder, fabricating an oil tank. I'll get that posted tomorrow.

The disc conversion is in place, bar the pipe, which I'll not fit until the final build, and the flat bars ordered are also fitted.


Thursday, 19 July 2012

A spare half day!

Finally, I found some time to spend in the garage. Jobs tackled (all partially)
  • Cut down the original seat pan (I also made an alloy flat pan, but dont like it.)
  • Fit the RM125 Rear wheel.
  • Cut the seat subframe down.
  • Cut the steel rear mudguard.
  • Cut the outline shape for the front mudguard.
  • Bend and shape some steel tube to judge if I'll use flat drag style or the original bars.

 I've trimmed 25mm of each side and 65mm from the length (at the front). I'm trying to retain the original seat hinge fittings, but they're ugly, and restricting the amount I can narrow the seat by. I think my best option will be to move the hinges to inside the frame rails.


The seat subframe "loop" will be welded back, which will close the current gap between the mudguard and seat.

Steel trailer muguard, £15.00 from Banbury trailers, delivered the next day, and almost ideal. It's specified for a 13" trailer wheel, and ideally a mudguard for a 15" wheel would be better, but, the width rises from an almost perfect 175mm to 200mm.

Two thirds of the mudguard are used here. Still needs some trimming at the bottom. I quite fancy drilling some holes in the lower section.


The remaining third of the trailer part is being used to fashion a small front mudguard. Still a bit wide, and I've still to find out what I legally need, but I want it as small as possible. Simply fitted to under side of the lower yolk, I'll use an alloy fender brace similar to the photo below. Again, I can feel some holes coming on!


I think I'll stick with flat drag style bars (not as fitted though, as I bent these by hand, wall way to thin)


Bit of welding, single light and number plate wount, lick of paint and it'sdone - If only.


Wednesday, 30 May 2012

All change at the front

No, not a reference to trenchwarfare during The Great War, but an improvement to the TS's stopping power.

A bit of long term thinking - not like me at all - got me pondering. While I'm sure that the 22bhp available to the descerning TS ER owner (when the bike was a bit younger) may have been deemed as OK by Suzuki, I cant help feeling that I'll crave a bit more horses in the future (I still wonder if RM250 or PE250 engine parts are compatible, or, indeed, if a 400 motor will slip in, but I digress) and more horses on the stock drum brake is a worry (I'm not sure it can cope with 22bhp it's so small) so, a disc braked front end then.

 Trawling through some forums, I came across a list of bike's (not a complete list, but enough for investigation of some options) on Caferacer that share the TS's 36mm diamete stanchion's (it's the same list from where the idea of using Suzuki's RM Air forks that were the original plan came from - now for sale on ebay) From this list I made a list of possible options, and started saving search lists on ebay (more bloody emails!) when "bingo" a complete set of new forks and yokes from a 2006 XT125 at a reasonable price (£726 new from Yamaha - ouch) of £139. Buy now button clicked, Paypal activated, and I've got some new disc compatible forks. Another £40 later and a 2006 wheel with disc and part worn tyre are also mine.

While it's quite a chunk of cash, I was into at least £100 to get the hub and rim re-spoked, idealy the other stanchions would have been re-chromed, another £165 (although most of the pitting is outside the all important area of travel) and a tyre was need anyway (£50?) so I'm actually better off, and with better brakes, and all new parts.

Not the best photo I've taken, but you can at least see the new front end

I really must.......

tidy the garage, it's only a few months old and already a mess.

Friday, 7 October 2011

Update - or not

More like or not!

Two things are preventing me from getting started. The lack of a V5 document from the DVLA. Finally, it's arrived. They state the donor is a 77 registered bike. As an ER it cant be, but to be honest, I've got a log book now, and thats good enough.

Secondly, I've still not got a workshop. To add to my woe's, a recent spell of bad weather flooded where I've got all my stuff stored. All my tools, inc my power tools, and the stripped down bike were under 12" of rainwater. The power tools have had it, everything else will be OK. Mind you, alot of our the furniture for the house was also in there, but hey, shit happens.

I've got all the bits I need now bar a speedo, a fork valve, a sprocket cover and a lock for the fuel tank lid, but I'm sure ebay will help me eventually.

Saturday, 20 August 2011

Fluid Engineering

Well, fluid in my thought's. 

My ebay sourced seat unit arrived. A nice bit of kit, and, seemingly made to fit the TS250 frame. Sitting perfectly over the rails, and married up to a cheap (as in a tenner, as in useable but in need of love) GT250 Fuel Tank also found on ebay looked pretty good. The tank will need some sheet metal work altering to fit perfectly, but that could have been easily achieved by grafting in a small section of the original ER Tanks underside. But, and it's a big but...................................


With the seat in place, the original bars dropped to give an idea of the seating position if fitted with some "Clubman" or "Ace" type bars, and my 6'2" frame (recovering from a prolapsed Disc) did not sit well on the TS250's dainty frame. Flat drag bars may help a bit, as would some rearsets - I kinda guessed where I thought my feet would end up, but concerned that I'll end up with a bike I cant ride for more than a few yards I need a re-think.


Wondering back to my thoughts about including some "Bratstyle" styling in the bike, the simple fact that I like "Street Tracker's", and the donor bike's off road pretences................................................

Clean and simple rump
and I like the use of number boards


even more so incorporating the headlamp unit

and I really like the idea of removing any factory airbox

Bratstyle seems to get it's influence from Cafe Racers, Bobbers and Trackers
Off to the Classic Jap Show at Knebworth today, mainly for it's Autojumble. I really need a fuel tank that I like as my starting point. The seat unit - if I go Bratstyle Tuck n Roll - has already been fabricated in the grey matter a dozen times, and the rest will be driven by the seat and tank.


Saturday, 13 August 2011

Starting point


Stripped down to a rolling chassis, and ready to start measuring up. The frame will only require minor mod's. Lose most of the rear seat subframe, and remove all unwanted brackets. The planned shorter front forks and 19" front wheel will decrease the rake and trail, which will quicken up the steering nicely. The donor bikes Fork tubes are behond economical repair, but will be used for some trial and error cuts. A nice pair have been sourced from ebay for £22.

Monday, 8 August 2011

A few tick's on the wishlist

I've been able to make a small start. Anything with a thread is getting a good soaking with Penentrating Fluid - daily.

Tank, Seat, Bar's, Wiring Harness, Mudguards and Oil Tank are all removed.

In the meantime, the ebay search engine is getting full throttle. I've managed to find a few bit's and bob's that could be useable. (photo's all the original listing photo's)


Glass Fibre, Alloy base, and upholstered and listed "Used but as New"
It's the 1st seat I've seen wide enough to fit the subframe.

Honda CD Wheel look's salvageable, and was cheap enough.
Oil Catch Tank - 180mm high could make a decent Two Stroke Oil Tank

280pc Stainless Socket Head Set - cheap at £10
TS Chrome Headlamp case, listed as rust free - hopefully it is

Tuesday, 2 August 2011

Initial Hurdles

With so many, where to begin.


Front wheel. 21" is just too big. A smaller front wheel should quicken the steering, give me a decent tyre choice, and if I can find a wheel from another model - a road bike rather than a dirtbike - improve the braking by having a larger brake. (I really would prefer a drum brake)


Suzuki GT550 Front End. But would it fit?
Front Forks. At 85cm in overall length, are they too long? If I shorten them - possibly easier than replacing them, although a complete front end from a road bike would resolve two problems - and have a smaller diameter wheel, how will the handling be. The standard forks are 36mm in diameter, many Suzuki alternative's, such as the GT above have a smaller diameter. Again, how will this effect the handling?


Looks simple enough, does the bike need it?
Rear Suspension. The ER Model has the rear shocks at a more acute angle. If I fit a shorter rear shock to match the ride height with the front end mod's this will increase the angle further.What effect's will this have on the handling? More of a concern, what effect will it have on the strength of the shock? Will I be fabricating some alternative mounting points? As with the front, would I be better to replace the entire rear end? If so, how or where can I find a list of suitable donor bikes?
Electrics. It appears most have been removed. From battery to lights. I need to see whats missing before I decide on the best action. Is it worth replacing them? Can you still get a daylight only MOT? What are the alternatives? What do I need to buy?


Am I still convinced this is a good idea? Actually, yes. It's a challenge.

and so it begin's

From this


to this


and eventually to something like this?


Yes this is a Suzuki T500 based Cafe Racer, but you get the idea.

The second photo is of an American build, based on a TS250. It can be done.

In truth, I can't start the build until November or December this year. I simply do not have a workshop to work in. When the Bob the Builder has finished, I'll have a nice new garage, and then the build will start in earnest.

In the meantime, I'll scour the web and visit some Autojumbles, gathering the bit's n bob's I need to convert my Suzuki TS250 into a back road scratcher - I hope.